dcos-tensorflow
SDK framework to run TensorFlow on DC/OS.
The DC/OS TensorFlow Service is an automated service that makes it easy to deploy and manage TensorFlow on Mesosphere DC/OS.
NOTE: This is a community package. Community packages are unverified and unreviewed content from the community.
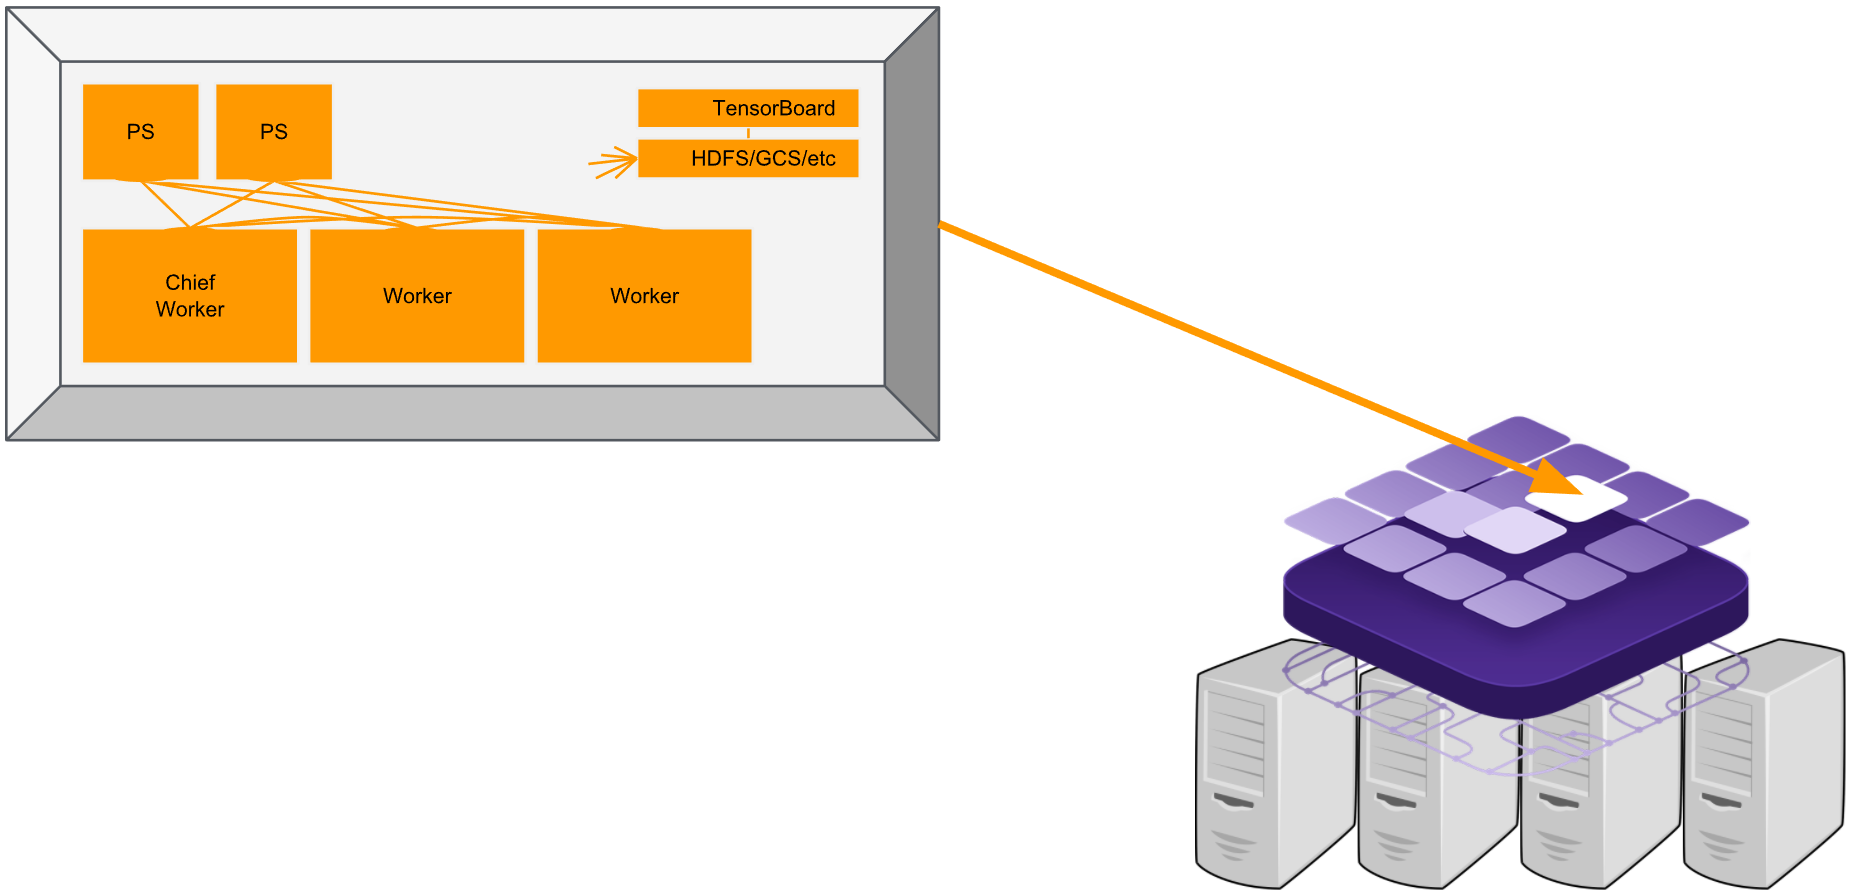
TensorFlow is an open-source software library for Machine Intelligence which is extremely powerful especially in a distributed setting. This framework aims to help manage the complexity of distributed training by leveraging the capabilities of DC/OS. It automates tedious and error-prone steps like task deployment, ClusterSpec configuration, task monitoring, failure recovery, etc.
Prerequisites
- A running DC/OS 1.10 cluster with at least 3 nodes having 6CPU, 12GB of memory in total. This exact amount depends on your configuration for the gpuworker, worker, and parameter_server tasks.
- DC/OS CLI installed.
- If you want to benefit from GPU acceleration, please check how to install DC/OS on GPU instances
- Check the tools repository, also including the examples.
Install TensorFlow
-
Install TensorFlow cluster with the following command from the DC/OS CLI from within
dcos-tensorflow-tools:$ dcos package install beta-tensorflow --options=examples/mnist.json -
The service will now deploy with an example configuration. You can monitor its deployment from the Services tab of the DC/OS web interface.
Installing and Customizing
Assuming you want to train your own models, you will need to create your own configuration to pass in when you
run dcos package install beta-tensorflow --options=.... The possible configurations are documented in the example section. For more information about building the
options.json file, see the
DC/OS documentation for service
configuration access.
Installation from the DC/OS Web Interface
You can install TensorFlow from the DC/OS cataloge. If you install TensorFlow from the web interface, you must install the TensorFlow DC/OS CLI subcommands separately. For installing just the DC/OS TensorFlow CLI, enter:
$ dcos package install beta-tensorflow --cli
Choose ADVANCED INSTALLATION to perform a custom installation.
Service Settings
Service Name
Each instance of TensorFlow in a given DC/OS cluster must be configured with a different service name. You can configure the service name in the service section of the advanced installation section of the DC/OS web interface. The default service name (used in many examples here) is tensorflow.
Job URL
This URL should point to a Python file or a ZIP containing a Python file. Each gpuworker, worker, and parameter_server tasks will download and extract the contents of this URL at runtime.
Job Path
This path will be appended to the PYTHON_PATH in each of your tasks, so that your job can be run from the wrapper script. If
you specified a Job URL which points to a ZIP, your Job Path should be the relative path from the directory in which that ZIP
was extracted to the directory where your main Python file lives. See the mnist example for more details.
Job Name
This field should match the name of your main Python file (without the path or extension). For example, if your main
Python file lives in myzip/path/train.py, your Job Path should be myzip/path, and your Job Name should be train.
Job Context
This field should include any runtime settings you want to make available to your main function. Any JSON you paste
here will be available to your main function as a Python dictionary with the context argument.
Shared Filesystem
The framework works best when you use GCS as a shared filesystem. To use GCS, you will need a bucket and a Service Account with read/write access to that bucket - see Using Google Cloud Storage for details. This field should point to that GCS bucket with the following format:
gs://<bucket-name>/path/to/folder
TF Image / GPU TF Image
By default, your TensorFlow jobs will run inside Docker containers based on the official TensorFlow images (with small additions to support HDFS). If your TensorFlow job has any special requirements, you can specify a custom image here (pulled from DockerHub).
GPU Worker / Worker / Parameter Server Settings
Adjust the following settings to customize the amount of resources allocated to each task. Your job’s resource requirements must be taken into consideration when adjusting these values. Reducing these values below those requirements may result in adverse performance and/or failures while using the service.
Each of the following settings can be customized under the gpu_worker/worker/ps configuration sections.
Count
You can choose how many GPU Workers, Workers, and Parameter Servers you want for each TensorFlow job you run.
CPU
You can customize the amount of CPU allocated to each instance of each type of task.
A value of 1.0 equates to one full CPU core on a machine.
Change this value by editing the cpus value. Turning this too low will result in throttled tasks.
Memory
You can customize the amount of RAM allocated to each instance of each type of task. Change this value by editing the mem value (in MB). Turning this too low will result in out of memory errors.
Ports
You can customize the ports exposed by the service via the service configuration. If you wish to install multiple instances of the service and have them co-locate on the same machines, you must ensure that no ports are common between those instances. Customizing ports is only needed if you require multiple instances sharing a single machine. This customization is optional otherwise. If your pod is on the overlay network (see below) then the port resources will be ignored allowing a pod to share a machine with another one using the same ports.
You can specify that a pod should join the dcos overlay network,
a Virtual Network
that supports having one IP address per pod.
When a pod joins an overlay network it gets its own IP address and has access to its own array of ports.
Therefore when a pod specifies that it is joining dcos we ignore the ports resource requirements,
because the pod will not consume the ports on the host machine.
The DNS for pods on the overlay network is
Note that this DNS will also work for pods on the host network. Because the ports resources are not used when a pod is on the overlay network, we do not allow a pod to be moved from the dcos overlay to the host network or vice-versa. This is to prevent potential starvation of the task when the host with the reserved resources for the task does not have the available ports required to launch the task.
Storage Volumes
The service supports two volume types:
ROOTvolumes are effectively an isolated directory on the root volume, sharing IO/spindles with the rest of the host system.MOUNTvolumes are a dedicated device or partition on a separate volume, with dedicated IO/spindles.
Using MOUNT volumes requires additional configuration on each DC/OS agent system,
so the service currently uses ROOT volumes by default. To ensure reliable and consistent performance in a production environment,
you should configure MOUNT volumes on the machines that will run the service in your cluster and then configure the following as MOUNT volumes:
Placement Constraints
Placement constraints allow you to customize where the service is deployed in the DC/OS cluster.
Placement constraints support all Marathon operators
with this syntax: field:OPERATOR[:parameter]. For example, if the reference lists [["hostname", "UNIQUE"]], use hostname:UNIQUE.
A common task is to specify a list of whitelisted systems to deploy to. To achieve this, use the following syntax for the placement constraint:
hostname:LIKE:10.0.0.159|10.0.1.202|10.0.3.3
You must include spare capacity in this list, so that if one of the whitelisted systems goes down, there is still enough room to repair your service without that system.
Examples
The dcos-tensorflow-tools comes with a number of examples ready to be used. It also comes with instructions on how to deploy your own examples.
Uninstalling
See the uninstallation documentation here
Connecting Clients
One of the benefits of running containerized services is that they can be placed anywhere in the cluster. Because they can be deployed anywhere on the cluster, clients need a way to find the service. This is where service discovery comes in.
Discovering Endpoints
Once the service is running, you may view information about its endpoints via either of the following methods:
- CLI:
- List endpoint types:
dcos beta-tensorflow --name=/tensorflow endpoints - View endpoints for an endpoint type:
dcos beta-tensorflow endpoints <endpoint>
- List endpoint types:
- Web:
- List endpoint types:
<dcos-url>/service/tensorflow/v1/endpoints - View endpoints for an endpoint type:
<dcos-url>/service/tensorflow/v1/endpoints/<endpoint>
- List endpoint types:
Returned endpoints will include the following:
.autoip.dcos.thisdcos.directoryhostnames for each instance that will follow them if they’re moved within the DC/OS cluster.- A HA-enabled VIP hostname for accessing any of the instances (optional).
- A direct IP address for accesssing the service if
.autoip.dcos.thisdcos.directoryhostnames are not resolvable. - If your service is on the
dcosoverlay network, then the IP will be from the subnet allocated to the host that the task is running on. It will not be the host IP. To resolve the host IP use Mesos DNS (<task>.<service>.mesos).
In general, the .autoip.dcos.thisdcos.directory and <task>.<service>.mesos endpoints will only work from within the same DC/OS cluster.
From outside the cluster you can either use the direct IPs or set up a proxy service that acts as a frontend to your TensorFlow instance.
For development and testing purposes, you can use DC/OS Tunnel
to access services from outside the cluster, but this option is not suitable for production use.
Managing
Updating Configuration
You can make changes to the service after it has been launched. Configuration management is handled by the scheduler process, which in turn handles deploying TensorFlow itself.
Edit the runtime environment of the scheduler to make configuration changes.
After making a change, the scheduler will be restarted and automatically deploy any detected changes to the service, one node at a time.
For example, a given change will first be applied to worker-0, then worker-1, and so on.
Some changes, such as decreasing the number of nodes or changing volume requirements, are not supported after initial deployment. See Limitations.
To make configuration changes via scheduler environment updates, perform the following steps:
- Visit
to access the DC/OS web interface. - Navigate to
Servicesand click on the service to be configured (defaulttensorflow). - Click
Editin the upper right. On DC/OS 1.9.x, theEditbutton is in a menu made up of three dots. - Navigate to
Environment(orEnvironment variables) and search for the option to be updated. - Update the option value and click
Review and run(orDeploy changes). - The Scheduler process will be restarted with the new configuration and will validate any detected changes.
- If the detected changes pass validation, the relaunched Scheduler will deploy the changes by sequentially relaunching affected tasks as described above.
To see a full listing of available options, run dcos package describe --config tensorflow in the CLI,
or browse the TensorFlow install dialog in the DC/OS web interface.
Adding more tasks
You can customize this value at initial deployment or after the cluster is already running. Shrinking the cluster is not supported.
Modify the WORKER_COUNT, GPU_WORKER_COUNT, and PARAMETER_SERVER_COUNT environment variables to update the task counts.
If you decrease this value, the scheduler will prevent the configuration change until it is reverted back to its original value or larger.
Please note that without a shared filesystem (GCS/HDFS/etc.), your Job will not be able to handle this update.
Resizing a Node
The CPU and Memory requirements of each node can be increased or decreased as follows:
- CPU (1.0 = 1 core):
WORKER_CPUS,GPU_WORKER_CPUS,PARAMETER_SERVER_CPUS - Memory (in MB):
WORKER_MEM,GPU_WORKER_MEM,PARAMETER_SERVER_MEM
Note: Volume requirements (type and/or size) cannot be changed after initial deployment.
Updating Placement Constraints
Placement constraints can be updated after initial deployment using the following procedure. See Service Settings above for more information on placement constraints.
Let’s say we have the following deployment of our nodes
- Placement constraint of:
[["hostname", "LIKE", "10.0.10.3|10.0.10.8|10.0.10.26|10.0.10.28|10.0.10.84"]] - Tasks:
10.0.10.3: worker-0
10.0.10.8: worker-1
10.0.10.26: worker-2
10.0.10.28: empty
10.0.10.84: empty
10.0.10.8 is being decommissioned and we should move away from it. Steps:
-
Remove the decommissioned IP and add a new IP to the placement rule whitelist by editing
NODE_PLACEMENT:[["hostname", "LIKE", "10.0.10.3|10.0.10.26|10.0.10.28|10.0.10.84|10.0.10.123"]] - Redeploy
worker-1from the decommissioned node to somewhere within the new whitelist:dcos tensorflow pods replace worker-1 - Wait for
worker-1to be up and healthy before continuing with any other replacement operations.
Restarting a Node
This operation will restart a node while keeping it at its current location and with its current persistent volume data. This may be thought of as similar to restarting a system process, but it also deletes any data that is not on a persistent volume.
- Run
dcos beta-tensorflow --name=/tensorflow pods restart worker-<NUM>, e.g.worker-2.
Replacing a Node
This operation will move a node to a new system and will discard the persistent volumes at the prior system to be rebuilt at the new system. Perform this operation if a given system is about to be offlined or has already been offlined.
Note: Nodes are not moved automatically. You must perform the following steps manually to move nodes to new systems. You can build your own automation to perform node replacement automatically according to your own preferences.
- Run
dcos beta-tensorflow --name=/tensorflow pods replace worker-<NUM>to halt the current instance (if still running) and launch a new instance elsewhere.
For example, let’s say worker-3’s host system has died and worker-3 needs to be moved.
- Start
worker-3at a new location in the cluster.$ dcos beta-tensorflow --name=/tensorflow pods replace worker-3
Disaster Recovery
If you use a shared filesystem like GCS, it will be available to your main function as log_dir. If you write all of your
checkpoint files to log_dir, Disaster Recovery will be a breeze! Your tasks will automatically be restarted when they fail,
they will all have access to the latest checkpoint file, and they will easily resume training from the latest checkpoint.
Accessing Logs
Logs for the scheduler and all service nodes can be viewed from the DC/OS web interface.
- Scheduler logs are useful for determining why a node isn’t being launched (this is under the purview of the Scheduler).
- Node logs are useful for examining problems in the service itself.
In all cases, logs are generally piped to files named stdout and/or stderr.
To view logs for a given node, perform the following steps:
- Visit
to access the DC/OS web interface. - Navigate to
Servicesand click on the service to be examined (defaulttensorflow). - In the list of tasks for the service, click on the task to be examined (scheduler is named after the service, nodes are each
worker-#-node). - In the task details, click on the
Logstab to go into the log viewer. By default, you will seestdout, butstderris also useful. Use the pull-down in the upper right to select the file to be examined.
You can also access the logs via the Mesos UI:
- Visit
/mesos to view the Mesos UI. - Click the
Frameworkstab in the upper left to get a list of services running in the cluster. - Navigate into the correct framework for your needs. The scheduler runs under
marathonwith a task name matching the service name (defaulttensorflow). Service nodes run under a framework whose name matches the service name (defaulttensorflow). - You should now see two lists of tasks.
Active Tasksare tasks currently running, andCompleted Tasksare tasks that have exited. Click theSandboxlink for the task you wish to examine. - The
Sandboxview will list files namedstdoutandstderr. Click the file names to view the files in the browser, or clickDownloadto download them to your system for local examination. Note that very old tasks will have their Sandbox automatically deleted to limit disk space usage.
Support and bug reports
The DC/OS TensorFlow package is currently community supported. If you get stuck, need help or have questions, just ask via one of the following channels: